eLearning at the CTL
Upcoming Events
All | Faculty | Grad Students
Contact
Centre for Teaching and Learning
Weldon Library (WL), Room 200
(519) 661-2111 x80346
ctl@uwo.ca
Part 1: Pre-Workshop Activities
Please note: Part 1: Pre-Workshop Activities will take 30 minutes to complete.
The purpose of the Pre-Workshop Activities is to:
- Introduce you to the Learning Types used in storyboarding,
- Map and reflect on the learning types you currently use in your course
- Prepare you for the storyboarding activity in Trello, including learning about some features and getting your own account and empty board set up.
After Part 1, you will either attend a storyboarding workshop in Zoom, or continue with "Part 2: Independent Storyboarding".
Defining course learning types (3 minutes)
In this activity, you will learn about learning types. After completing the activity, you will have:
- A visual representation of the learning types in your course
- A reflection on the learning types represented in your course
Defining Course Learning Types (Video 2)
Review the Learning types and some example activities below.
Acquisition
Learning through acquisition is what learners are doing when they are listening to a lecture or podcast, reading from books or websites, and watching demos or videos.
Traditional activities
- Reading books, journals, papers
- Listening to lecture in class
- Watching lab demonstrations or simulations
Online activities
- Reading electronic documents or e-books (Course Readings Tool in OWL, Other OWL content, online journals)
- Listening to podcasts or streaming videos in short, digestible chunks (Via OWL, YouTube, iTunes)
- Watching lab demonstrations or simulations
Collaboration
Learning through collaboration encompasses discussion, practice, and production. Building on investigations and acquisition, it is about learners taking part in the process of knowledge building together.
Traditional
- Small group project requiring face-to-face meeting
- Commenting on others’ input in a class discussion
- Watching lab demonstrations or simulations
- Building a joint output
Online
- Small group project work using OWL discussion forums, Microsoft 365, Google Drive, Zoom, VoiceThread
- Analyzing the ideas and information in a range of digital resources
- Building a joint output on a topic in Microsoft OneDrive or Wordpress
- Using digital tools to collect and analyze data (open data)
- Comparing digital texts (eReserve)
- Searching and evaluating information and ideas found online or in library databases
Discussion
Learning through discussion requires the learner to articulate their ideas and questions, and to challenge and respond to the ideas and questions from the instructor and/or from their peers.
Traditional
- Tutorial sessions
- Seminars
- Discussion in groups
- Discussion in class
Online
- Asynchronous: OWL Discussion forum, VoiceThread, Google Group
- Synchronous: Zoom, Blackboard Collaborate
Investigation
Learning through investigation guides the learner to explore, comparing and critiquing the texts, documents and resources that reflect the concepts and ideas being taught.
Traditional
- Using text-based study guides (textbooks, course packs)
- Analyzing the ideas and information in a range of materials and resources
- Using conventional methods to collect and analyze data
- Comparing texts
- Searching and evaluating information and ideas
Online
- Using digital study guides (e-books, open textbooks, eReserves)
- Analyzing the ideas and information in a range of digital resources
- Using digital tools to collect and analyze data (open data)
- Comparing digital texts (eReserve)
- Searching and evaluating information and ideas found online or in library databases
Production
Learning through production motivates the learner to consolidate what they have learned by articulating their current conceptual understanding and how they used it in practice.
Traditional
- Producing documents, e.g. statements, essays, reports
- Producing designs
- Presentations
Online
- Producing electronic documents (OWL, Microsoft 365, Google Drive)
- Creating designs (OWL, Microsoft 365, Google Drive, Wordpress)
- Presentations (Google Slides, voice over PowerPoint, Zoom)
Practice
Learning through practice enables the learner to adapt their actions to a task or goal, and use the feedback they get from self-reflection, their peers, their instructor, or the activity itself to improve the result of their action in relation to the goal.
Traditional
- Practice exercises
- Labs
- Field trips
- Face-to-face role-play activities
Online
- Self-assessment tests (OWL Quiz)
- Virtual labs
- Virtual field trips
- Online role play activities or simulations
Map your course learning types (10 minutes)
After completing the activity, you will have:
- A visual representation of the learning types in your course
- A reflection on the learning types represented in your course
- Look at your syllabus. Reflect on the learning types you see most often, jotting down notes in the margins about the learning types in your current course design if you wish.
Map your current course learning types using the spider web graph tool, and save a copy of it for Part 2 of the workshop.
Reflect
Look at the map of your current course learning types and reflect on the following questions.
Does this represent what I intended when I designed my course?
Are there any learning types that are over- or under-represented?
Are there any gaps I want to address?
Introduction to storyboarding (15 minutes)
In this section, you will
- Watch an introduction to the storyboarding process, and
- Watch an introduction to storyboarding in Trello
- Sign up for Trello and make your own copy of our template storyboard
Introduction to Storyboarding (Video 3)
Getting started with Trello
We are using a tool called Trello for the storyboarding process. The tool is fairly intuitive, but creating a log-in and learning the basic functions of the tool ahead of time will make the storyboarding process go smoothly.
By the end of Getting started with Trello, you will be able to:
- Make an account and log in,
- Create a blank storyboard from our template,
- Add a new learning activity card,
- Move a learning activity card,
- Specify an instructional activity, and
- Add an assessment.
Make an account at trello.com
Go to trello.com and click "Sign Up" (or log-in if you already have an account). Our team uses our uwo.ca addresses for Trello.
Make a storyboard for your course
- Open the “ABC Online Course Design at Western" template.
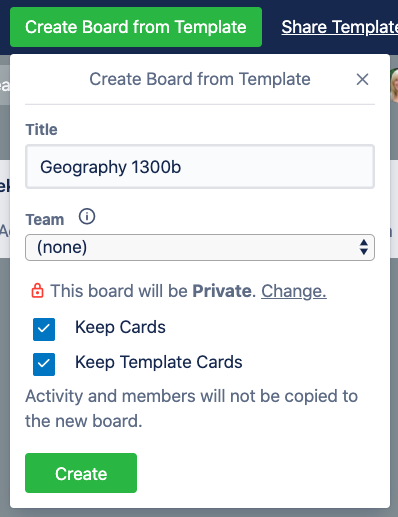
- Click “Create board from template” at the top of the screen.
- Change the title to your course name, and make sure “Keep Cards” and “Keep Template Cards” are selected.
Invite collaborators if applicable
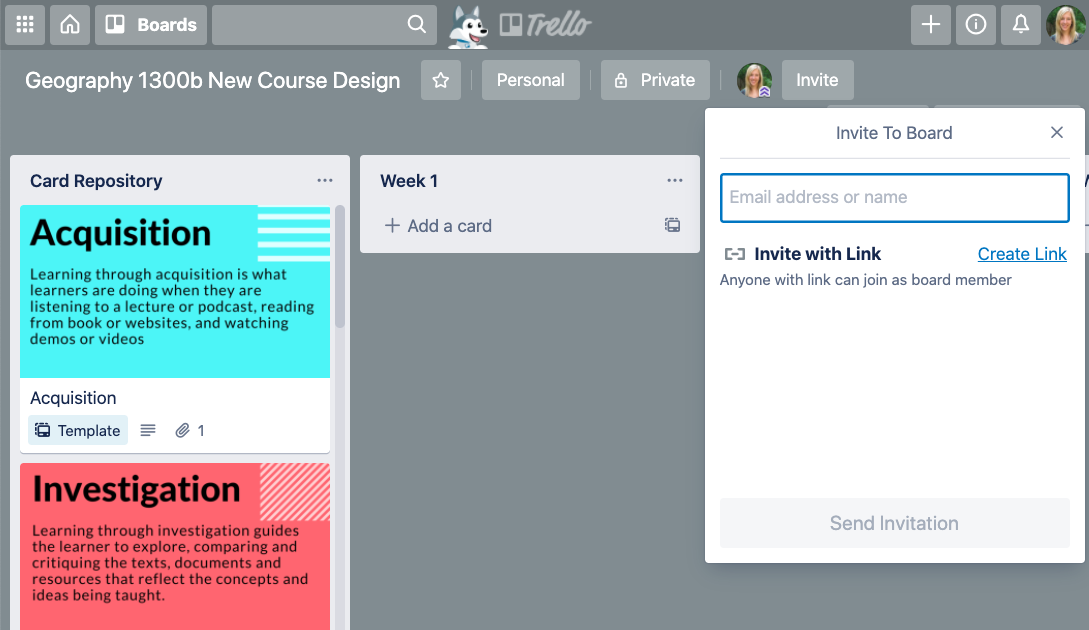
If you have collaborators or co-instructors, clicking “Invite”. You can share the link or enter their email addresses directly.

Now you're ready to explore how the Trello board works, but you can save storyboarding for Part 2.
Storyboarding in Trello (ABC Video 4)
We have simplified the look of the cards so your boards have a sleeker look, so don't worry about slight differences between your board and the video - they function the same.
Try some of the tasks introduced in the video. Complete the following:
- Add learning type cards for the first two weeks by clicking the icon in the bottom right corner of the list
- Try re-arranging a card
- Type in instructional activities for each card
Don't worry if you're not sure about what you've created so far. Just give it a try and we'll clarify during Part 2.
If you’re attending one of our Zoom sessions, congratulations! You’ve completed your pre-work and are prepared for our workshop. You have in hand:
- A syllabus with learning outcomes (hard copy is a bonus!)
- A graph of learning types of your current course (spiderweb graph)
- A mostly blank trello board, other than the cards you added in weeks 1 and 2.
For further context, you are more than welcome to watch the videos in Part 2 before attending a Zoom workshop, but it is not necessary.

If you’re planning to continue with storyboarding on your own, continue below.
Creative Commons Attribution-NonCommercial-ShareAlike 4.0 International License.

